Introduction
So, you’ve decided to transform your home with new vinyl flooring, a brilliant choice! Whether you’re updating a tired kitchen, refreshing a bathroom, or giving your hallway a new lease of life, vinyl flooring is one of the most versatile, affordable, and beginner-friendly flooring options available. The best part? You don’t need to be a tradesperson to get professional-looking results. With the right preparation, tools, and a bit of patience, fitting vinyl flooring is a genuinely satisfying DIY project that can be completed over a weekend.
In this guide, we’ll walk you through everything — from the benefits of choosing vinyl, to laying it on floorboards, in kitchens, and on virtually any surface. Let’s get started.
Why Choose Vinyl Flooring?
Before we dive into the how-to, it’s worth understanding why so many homeowners are choosing vinyl flooring. It’s not just about looks — though modern luxury vinyl plank (LVP) and cushioned vinyl sheet flooring do look stunning. Here’s what makes it such a popular pick:
- Water-resistant: Ideal for kitchens, bathrooms, and utility rooms where spills are common.
- Durable and hard-wearing: Withstands heavy foot traffic without showing wear.
- Easy underfoot: Cushioned vinyl offers a softer, warmer feel than tiles or hardwood.
- Affordable: One of the most cost-effective flooring solutions on the market.
- DIY-friendly: No specialist tools or adhesives required for most installations.
Preparing Your Space for Installation
Preparation is the unsung hero of any successful flooring installation. Skipping this step is the number one reason DIY vinyl jobs go wrong. Here’s what you need to do before you unroll a single tile or sheet:
1. Clean and Clear the Subfloor
Remove all furniture, skirting boards (if replacing), and any existing flooring. Sweep and vacuum thoroughly to remove dust, grit, and debris. Even a small piece of gravel can cause a bump that shows through your new vinyl.
2. Check for Moisture
Vinyl flooring and moisture don’t mix well long-term. Use a moisture meter or lay down a polythene sheet overnight. If condensation appears underneath, address the damp issue before proceeding.
3. Level the Surface
Vinyl shows every imperfection beneath it. Fill dips, cracks, or gaps with a self-leveling compound or floor leveller. On floorboards, ensure all boards are firmly fixed — tap down any loose nails or add screws to squeaky boards. Consider laying hardboard sheets over floorboards for an ultra-smooth base.
- Let the Vinyl Acclimatise
Leave your vinyl flooring in the room for at least 24–48 hours before fitting. This allows it to adjust to the room’s temperature and humidity, preventing expansion or contraction after installation.
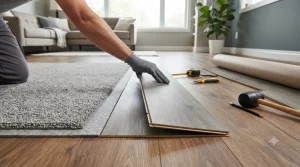
Step-by-Step Guide to Fitting Vinyl Flooring
Now for the main event. Whether you’re installing vinyl sheet flooring, vinyl tiles, or luxury vinyl planks, the following steps will guide you through the process.
- Measure your room carefully. Measure the width and length, then add 10cm to each side for trimming. For irregular rooms, create a paper template.
- Plan your layout. For sheet vinyl, unroll it in a larger space first and cut to a rough size. For planks or tiles, dry-lay them to find the best starting point, ideally working from the centre of the room outward.
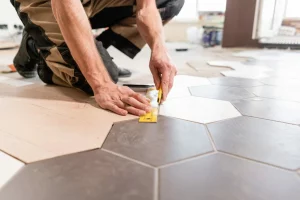
- Cut to fit. Use a sharp utility knife and a metal straight edge. Score and snap for clean edges. Take your time around door frames, corners, and pipes — these are where precision really matters.
- Fix in place. Many modern vinyl floors are loose-lay or click-fit, requiring no adhesive at all. If using adhesive-backed vinyl or a glue-down method, apply the recommended flooring adhesive with a notched trowel and allow it to become tacky before placing the vinyl.
- Trim and finish. Once laid, trim any excess neatly along walls. Refit skirting boards or apply vinyl threshold strips at doorways for a professional finish.
How to Lay Vinyl Flooring on Floorboards
Floorboards are a common challenge in older UK homes. The gaps, grooves, and unevenness between boards can telegraph through your new vinyl if not dealt with properly. The recommended approach is to lay 3mm or 6mm hardboard sheets across the entire floor, smooth side up, secured with ring-shank nails every 15cm. This creates an even, solid surface perfect for vinyl. Once the hardboard is down, follow the standard installation steps above.
How to Lay Vinyl Flooring in a Kitchen
Kitchens present unique challenges: kitchen units, awkward angles, and appliances all need to be worked around. Start by removing kickboards at the base of your units. Slide the vinyl underneath rather than cutting tight to the unit edge — this gives a much neater result and protects against water ingress. Use a seam sealer where two pieces of sheet vinyl meet, and consider a waterproof adhesive tape at joins for extra protection near the sink or dishwasher area.
Common Mistakes to Avoid
- Skipping the subfloor prep: Lumps and dips will show through — always level first.
- Not acclimatising the vinyl: Cold vinyl is stiff and harder to work with, and may shrink after fitting in a warm room.
- Cutting too tight: Leave a slight gap at walls — it will be covered by skirting — to allow for natural expansion.
- Using a blunt knife: A blunt blade tears rather than cuts cleanly. Replace your blade regularly for crisp edges.
- Ignoring manufacturer guidelines: Always check your specific product’s installation instructions as requirements vary.
Conclusion: You’ve Got This!
Fitting vinyl flooring is one of the most rewarding home improvement projects you can tackle. With the right preparation, a careful approach, and quality materials, the results can look every bit as impressive as a professional installation — and you’ll have the satisfaction of knowing you did it yourself.
Whether you’re laying vinyl in a kitchen, over old floorboards, or throughout an entire ground floor, the principles remain the same: prepare well, take your time, and don’t rush the cuts. If you’re ready to get started, browse the full range of vinyl flooring at qflooring.co.uk/ from cushioned sheet vinyl to contemporary luxury vinyl planks, there’s something for every home and every budget. Happy fitting!
Not sure which vinyl is right for your space? Our friendly team is here to help, contact us today, and we’ll guide you to the perfect floor.
FAQs
Q1. How long does it take to fit vinyl flooring? Most rooms can be completed in a single day. A standard-sized kitchen or living room typically takes 4–6 hours, including preparation time. Larger or more complex spaces with lots of cuts around obstacles may take longer. Proper subfloor prep is the most time-consuming part, so don’t rush it.
Q2. Do I need to remove old flooring before fitting vinyl? Not always. Vinyl can be laid over existing hard flooring such as tiles or concrete, provided the surface is clean, flat, and firmly fixed. However, laying over carpet is not recommended as it is too soft and uneven. Always check the manufacturer’s guidelines for your specific product.
Q3. Can I fit vinyl flooring myself, or do I need a professional? Vinyl flooring is one of the most DIY-friendly flooring options available. Most modern vinyl — particularly click-fit and loose-lay types — requires no special tools or adhesives. As long as you prepare the subfloor correctly and take your time with cuts, a confident DIYer can achieve professional results.
Q4. What is the best vinyl flooring for a kitchen? For kitchens, look for a vinyl with a strong wear layer (at least 0.3mm) and full waterproof properties. Cushioned sheet vinyl is a popular choice as it is warm underfoot, water-resistant, and easy to clean. Luxury vinyl tiles (LVT) are also an excellent option for a more premium look.
Q5. How do I fit vinyl flooring around a toilet or awkward shapes? The best method is to create a paper template of the shape first. Lay the paper flat against the obstacle, crease it firmly to trace the outline, then cut it out and transfer the shape to your vinyl before cutting. This avoids costly mistakes and gives you a precise, neat fit.
Q6. How do I keep vinyl flooring looking its best after installation? Vinyl flooring is very low maintenance. Sweep or vacuum regularly to remove grit that can scratch the surface. Mop with a damp cloth and a pH-neutral cleaner — avoid harsh chemicals or steam mops as these can damage the wear layer over time. Use felt pads under furniture legs to prevent indentations.